
Wednesday, April 4, 2012
Simple Bouquet
This is an easy bouquet that can be made at home. You can make a larger one, or a smaller one depending on your need. I just used some flowers from the grocery store, some floral tape and some ribbon. You can make the bouquet look however you want.

Monday, March 19, 2012
Customized Tool Pouch
This is an idea for a customizable tool pouch that is belted around the waist. I made it so that I would have a convenient place for my gardening tools while I'm outside working on my yard. It has a velcro pocket on the top, two places for pens or skinnier tools and a larger pocket for a notebook or iPod. The band on the front gives me a place to hang my scissors, and my gloves when I'm not using them. The strap is adjustable, and the pouch is not sewn to the belt so that it can move around.
The materials used were:
1 yard heavy canvas fabric
1 1/2 yards heavy 1in belt material
1 pkg extra wide double folded bias tape
1 spool heavy duty jeans thread
1 parachute buckle
8 in heat fusible velcro
Jeans needle
I made the pattern up as I went, but the basic idea was to figure out how big I wanted it to be, what I could fit in that space, and then cut out the pieces 1 in larger to account for seams. When using heavy duty thread on such thick fabric, be sure and increase the thread tension on your machine. There are lots of patterns for cute bags out there, and you can always tweak them and make them perfect for you.

Saturday, March 10, 2012
Composition Notebook Cover
This is a cover for a composition notebook. It can be as personal or ordinary as you like. You can use scraps of all shapes and sizes, but the finished piece, (before sewing the fold over which will secure the notebook inside, but after hemming), should be 24" x 12". I used some scraps of black, purple, and red fabric and then added some buttons, some fringe trim and a wooden letter I painted. Use your imagination! It's perfect for a birthday gift for a college or high school student.


Thursday, February 23, 2012
Floating Candle Floral Centerpieces
These centerpieces combine a silk flower arrangement with a floating candle to give your table some real depth.


You can use any clear glass vase or bowl, any rocks or sand, and any type of silk flower. However, be sure to rinse the flowers in water first to remove any excess dye which might color your water. Place your rocks and flowers first. Then tilt the vase slightly and pour the water in down the side. This helps prevent the water from disturbing your floral arrangement.
These can be used as stand alone centerpieces or as the focal point of a larger centerpiece.
Homemade Recycled Tea Lights
I love candles. I also love the scented wax that you melt in electric warmers. But what do you do with a candle that burns through the middle and leaves all the wax around the side untouched? Or a taper that drips so badly you can't every burn it? What about all that left over wax from the warmer that no longer has a scent?
It feels so wasteful just throwing all that unused wax away, so don't! Collect the wax from your warmer in an old glass jar. Store all your used candles in a box until you have enough. Then use all this wax you have collected and recycle it into new candles!
This might sound difficult, but it's really simple once you get started.
A few quick warnings:
Tools:
1 large stock pot
1 metal pitcher with handle (a wax melting pitcher can be purchased at most craft stores)
1 half inch cookie sheet
1 paring knife
1 flat metal spatula
cookie cutters of any shape or size
wax
aluminum foil
toothpicks
roll of zinc cored wick (also available at most craft stores)
The first step is getting the old wicks out of the used candles, and is the most difficult and time consuming. Using a paring knife, carefully dig the wick out of the used candles. You can also slice the sides off of the candle until the wick is easier to access. Tapers are a bit trickier. Very carefully slice pieces of the taper off, leaving the wick in tact. Another method for getting wicks out, is to melt the candles down, wicks and all, and then pour the melted wax through a sieve before using it. Either way works just as well. Wax from a warmer that has been collected in a glass jar can be melted down in the glass jar, or scooped out with an ice cream scoop or spoon. Once you have your candle wax chopped up it should look something like this:


Carefully pour the melted wax into the cookie sheet. Be sure the cookie sheet is on a solid flat surface, preferably a counter top or table.


It feels so wasteful just throwing all that unused wax away, so don't! Collect the wax from your warmer in an old glass jar. Store all your used candles in a box until you have enough. Then use all this wax you have collected and recycle it into new candles!
This might sound difficult, but it's really simple once you get started.
A few quick warnings:
- DO NOT use tools which will later be used for cooking
- NEVER leave your project unattended.
- DO NOT rinse or wash your tools in the kitchen sink or dishwasher. This causes a wax build up in your pipes and can lead to serious plumbing problems.
- Use the proper precautions when dealing with melted wax. Keep a first aid kit handy to address any accidental burns that might occur.
- While optional, an apron and nitrile gloves are recommended. This keeps your clothes protected as well as protecting your hands from staining dyes and possibly irritating scented oils that might be in your used candles.
Tools:
1 large stock pot
1 metal pitcher with handle (a wax melting pitcher can be purchased at most craft stores)
1 half inch cookie sheet
1 paring knife
1 flat metal spatula
cookie cutters of any shape or size
wax
aluminum foil
toothpicks
roll of zinc cored wick (also available at most craft stores)
The first step is getting the old wicks out of the used candles, and is the most difficult and time consuming. Using a paring knife, carefully dig the wick out of the used candles. You can also slice the sides off of the candle until the wick is easier to access. Tapers are a bit trickier. Very carefully slice pieces of the taper off, leaving the wick in tact. Another method for getting wicks out, is to melt the candles down, wicks and all, and then pour the melted wax through a sieve before using it. Either way works just as well. Wax from a warmer that has been collected in a glass jar can be melted down in the glass jar, or scooped out with an ice cream scoop or spoon. Once you have your candle wax chopped up it should look something like this:

Next, fill your stock pot half way full with water and bring to a boil. Fill your metal pitcher 3/4 full of wax chips and place in the boiling water. Turn your stove to low and let the wax melt.


Let the wax cool until it is warm to the touch. The best test is to rest your hand on the wax to test for temperature. Press down slightly. If your hand sinks or makes an indentation, the wax is still too soft. The color or the wax should be uniform.

Next, using a cookie cutter, cut out the wax in the same manner as cookie dough.


Once you have made cut outs in the whole pan, or as many as you would like, use the metal spatula to carefully remove the wax cut outs from the cookie sheet. The left over wax, not used in a shape, can be placed back into the metal pitcher and melted back down for another batch. As you remove the shapes, carefully run a toothpick through the center of the shape and twist it around a couple times. This is where the wick will be. If you are making a larger shape and wish to have enough room for multiple wicks, simply make multiple holes where you want your wicks to be.


Do this with each shape and then set them on a piece of aluminum foil to harden. Make sure the shapes are completely cool and hard before continuing.

Lastly is the wick. Cut an inch long piece of zinc cored wick from your spool.

Thread the wick through the hole in your shape. If the hole is still a bit too small, push a toothpick through again to widen it a bit. Push the wick through until there are equal amounts on both sides of the shape. Flatten one side of the wick against the wax. This will be the bottom of your candle.

Leave the other side of the wick up. This is the part of the wick you light.

Enjoy your candles! You can use a cookie cutter that makes a shape that will fit into a holder, or you can simply set your homemade candle on a plate or in a shallow bowl. You can use this technique to make candles for any occasion. Because of their shortness, these candles also float.
If you want to make a taller candle, simply cut a longer piece of wick and string as many wax pieces onto it as you would like.
There are so many things you can do with these homemade candles including:
- House warming gifts
- Wedding decorations or gifts
- Centerpieces
- Home decor
- Romantic evenings
- Gift for any occasion
- And anything else you can think of!
Happy Crafting!
Christmas in February?!
That's right. Christmas. We've all done it. December rolls around and we are scrambling to get all our cards and newsletters out. Give yourself a little break this year, and get your cards done early. This gives you the opportunity to hand-make and personalize this yearly tradition. Then in December, you just pull them out, stick your newsletter inside and send them out! One less thing to worry about.
One of the best ways to make Christmas cards is to save the front parts of the cards you receive for use in your own cards. Another fun thing to do is to save pieces of cute and stylish wrapping paper from Christmas morning, punch out some shapes, and paste them to your cards for the next year.
There are hundreds upon thousands of ideas for Christmas cards, here are just a few.

A snowflake garden.

Using the edge of a piece of card-stock like a stamp and some dark green ink turned this white card into something a little more festive.

Large stamps are simple, beautiful, and give the look of much more work than they are.

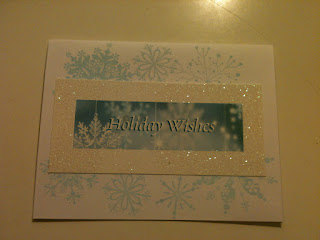
This card was made using a large tag punch out and two different holiday papers tied together with a little ribbon.

The snowflakes were cut out from a piece of scrapbook paper.


The red around the edges of this card was made by lightly rubbing the edges on an ink pad.


The glittery holiday wishes cam from a previous years Christmas card.


By using the edge of a piece of card-stock to make the red and then going over the entire front with gold, this wrapping paper look was achieved.


Using the same stamp, first in red and then directly over top in gold gave this card a more vintage look.

Rubbing a silver ink pad over the front of the card gave it the tiniest hint of glitter.


Follow the Rainbow!
St. Patrick's Day! One of the funnest holidays of the year for crafting! These are some fun ideas for cards to send around this March 17th. Mix and match and make it your own!

Adhesive sticker paper was used to make the rainbow and gold coins. If you don't have a cauldron shape, stamp a cup or hat on black paper to give you a basic shape and make your own!


This card gives the illusion of a rainbow falling from the sky. Individual letter stamps were used to make the words.

Simple gold paper cut into circles and stacked makes gold coins a cinch!

This design used a piece of 4-leaf clover paper and a circle punch to make nearly 20 independent circles. They were then layered on top of each other and glued down to create this cute design.


Happy crafting!
Subscribe to:
Comments (Atom)